
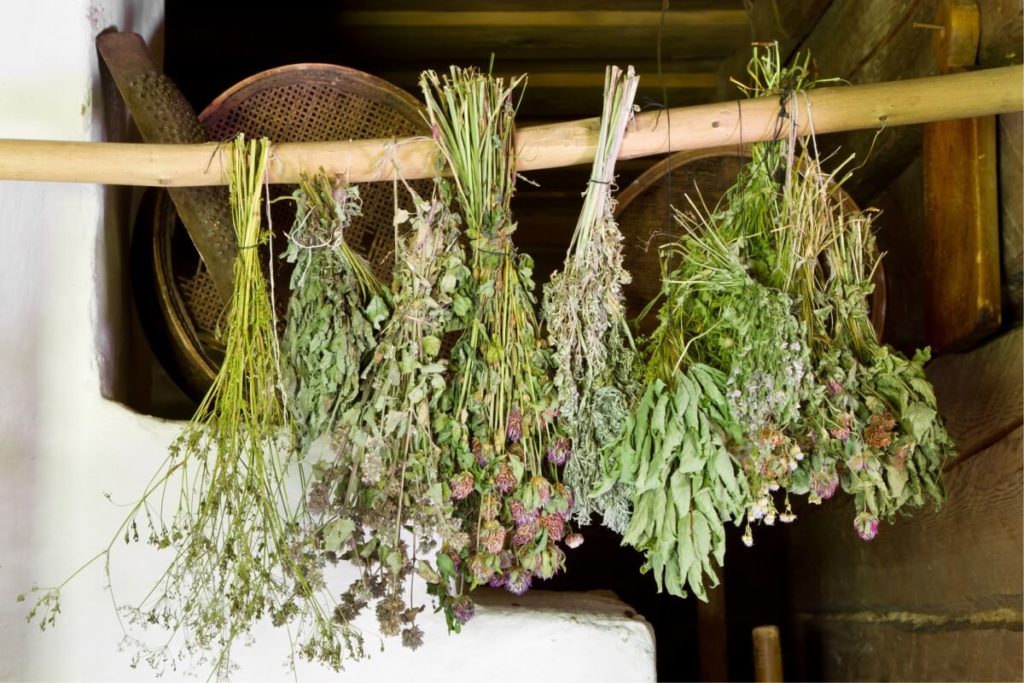
If you’re looking to preserve your freshly harvested herbs for long-term storage, then drying them is the way to go!
Not only does it help maintain their flavor and aroma, but proper drying techniques can also prevent spoilage and mold growth.
We will walk you through the step-by-step process of harvesting and drying herbs for long-term storage, so you can enjoy your homegrown herbs all year round.
From selecting the right herbs to using a food dehydrator or sun drying, we’ve got you covered with expert tips and tricks to ensure successful preservation.
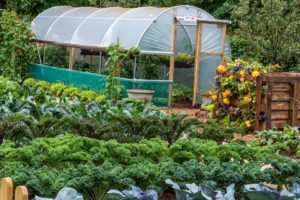
Choose the right herbs
Not all herbs are suitable for long-term storage. Choose herbs that are durable and can withstand the drying process, such as lavender, chamomile, and lemon balm.
Some herbs are more durable and better suited for drying, while others may lose their potency and flavor quickly.
To ensure the best results, it’s essential to choose herbs that are robust and can withstand the drying process.
One of the best options is lavender, which has a low water content and a strong fragrance that remains intact even after drying.
Chamomile is another excellent choice, as it contains compounds that help preserve its flavor and aroma during storage.
Lemon balm is a versatile herb that maintains its potency and taste when dried, making it an excellent option for long-term storage.
By selecting these durable herbs, you can enjoy their benefits for an extended period, even when fresh supplies are unavailable.
Harvest at the right time
Harvest herbs just before they reach their full growth or when they are at their peak aroma and flavor. For example, harvest spring herbs in the early morning, while the dew is still present, to preserve their delicate flavor and texture.
To maximize the flavor and quality of your herbs, it’s essential to harvest them at the right time.
This means gathering your spring herbs in the early morning, when the dew is still present, to preserve their delicate flavor and texture.
This is because the dew adds moisture to the leaves, which helps to enhance their flavor and aroma.
By harvesting your herbs before they reach their full growth, you can ensure that they remain tender and have the best possible flavor.
The peak aroma and flavor of your herbs will be when they are at their fullest growth, so harvesting them just before they reach this point will ensure that you get the most out of your herbs.
Use sharp pruning scissors
Use sharp pruning scissors to cut the herbs at the base of the plant, leaving a small amount of stem intact. This will help prevent the herbs from drying out too quickly.
When pruning herbs, it’s essential to use sharp pruning scissors to ensure a clean cut and prevent damage to the plant.
Cut the herbs at the base of the plant, leaving only a small amount of stem intact.
This technique helps to prevent the herbs from drying out too quickly, as the remaining stem will continue to provide moisture and nutrients to the plant.
By cutting the herbs at the base, you’re also encouraging new growth and promoting a healthy, bushy texture.
This technique is particularly useful for herbs like basil and rosemary, which can be prone to drying out if not properly cared for.
So, grab those sharp pruning scissors and get to work – your herbs will thank you!
Drying in small batches
Dry herbs in small batches to ensure even drying and prevent overcrowding. Overcrowding can lead to moldy or musty herbs.
To ensure the highest quality and optimal flavor, it’s essential to dry herbs in small batches, as overcrowding can lead to moldy or musty herbs.
When herbs are crowded, moisture can become trapped, creating an ideal environment for mold and mildew to grow.
This not only affects the aroma and flavor of the herbs but also their appearance, making them unsuitable for use in cooking or herbal remedies.
By drying herbs in small batches, you can maintain even drying and prevent overcrowding, resulting in herbs that are crisp, fragrant, and ready for use.
To achieve this, separate herbs into small clusters or bunches, and spread them out in a single layer on a drying rack or tray.
This will allow air to circulate freely around each herb, ensuring even drying and preventing overcrowding.
Monitoring the drying process closely and adjusting the temperature and humidity levels as needed can further ensure the best possible results.
Use a food dehydrator
Invest in a food dehydrator, which can gently dry herbs while maintaining their delicate flavor and aroma. A dehydrator can be set to low heat and low humidity, perfect for preserving herbs.
If you’re looking for a way to preserve your freshly picked herbs without sacrificing their delicate flavor and aroma, consider investing in a food dehydrator.
Unlike other methods of drying, such as oven drying or air drying, a food dehydrator uses gentle heat and low humidity to carefully dry your herbs, ensuring that they retain their natural flavors and aromas.
With a dehydrator, you can set the temperature and humidity levels to optimize the drying process, and you can even add a fan to improve air circulation and speed up the drying time.
Plus, dehydrating herbs in a food dehydrator is a low-maintenance and energy-efficient way to preserve them, as it uses less electricity than other methods.
So why not give it a try and enjoy your freshly dried herbs all year round?
Dry herbs in a single layer
Spread herbs out in a single layer on the dehydrator trays to ensure even drying. Overlapping herbs can cause them to mold or mildew.
To achieve the best possible results when dehydrating herbs, it’s important to spread them out in a single layer on the dehydrator trays.
Overlapping herbs can lead to uneven drying and the formation of mold or mildew.
When herbs are stacked on top of each other, moisture can become trapped and create an ideal environment for bacteria to grow.
This not only affects the flavor and aroma of the herbs, but it can also lead to spoilage and food safety issues.
By spacing herbs out in a single layer, air can circulate freely around each herb, allowing for even drying and preventing the risk of mold or mildew growth.
This single-layer arrangement ensures that each herb receives an adequate amount of heat and airflow, which can help to preserve their delicate flavors and aromas.
So, be sure to spread your herbs out in a single layer on the dehydrator trays for the best possible results.
Monitor temperature and humidity
Monitor the temperature and humidity levels during the drying process to ensure the best possible results. Herbs should be dried slowly, between 40°F and 60°F, with a relative humidity of 20% to 40%.
When it comes to drying herbs, temperature and humidity levels are important factors to consider to achieve the best possible results.
It’s important to monitor these levels during the drying process to ensure that your herbs are dried slowly and evenly.
The ideal drying temperature is between 40°F and 60°F, with a relative humidity of 20% to 40%.
This temperature range allows for the optimal evaporation of moisture from the herbs, which helps preserve their flavor, aroma, and nutritional content.
If the drying temperature is too high, the herbs may become over-dried and lose their potency, while too low a temperature may result in slow drying and the growth of microorganisms.
By carefully monitoring the temperature and humidity levels, you can ensure that your herbs are dried to perfection, retaining their natural goodness and making them suitable for use in a wide range of applications.
Store in airtight containers
Once the herbs are dry, store them in airtight containers to maintain their freshness. Glass jars with tight-fitting lids are ideal for long-term storage.
To ensure the longest shelf life for your dried herbs, store them in airtight containers as soon as possible after the drying process is complete.
Glass jars with tight-fitting lids are an excellent choice for long-term storage, as they prevent exposure to air and moisture, which can cause the herbs to lose their potency and flavor.
Airtight containers also help to protect the herbs from any pests or contaminants that may be present in the storage area.
When selecting airtight containers, look for ones that are made of high-quality materials, such as glass or food-grade plastic, and that have a tight-fitting lid to prevent any air or moisture from entering.
Consider storing the herbs in a cool, dark place, such as a pantry or cupboard, to further prolong their shelf life.
Keep the containers away from direct sunlight
Direct sunlight can cause the herbs to lose their flavor and aroma. Keep the containers in a cool, dark place to preserve the herbs’ quality.
To maintain the optimal quality of your freshly harvested herbs, it is essential to store them in a cool, dark place.
Direct sunlight can cause the herbs to lose their flavor and aroma, as the UV rays can break down the essential oils and volatile compounds that give the herbs their characteristic taste and scent.
When exposed to direct sunlight, the herbs can become limp and lose their vibrant green color, signifying a loss of potency and flavor.
To prevent this from happening, it is best to store your herbs in airtight containers in a cool, dark location, such as a pantry or cupboard.
This will help to preserve the herbs’ flavor and aroma, ensuring that they remain fresh and potent for a longer period of time.
You can consider storing your herbs in the refrigerator to further extend their shelf life.
Label and date the containers
Keep track of the harvest date and the type of herb in each container by labeling them with the relevant information. This will ensure you know which herbs to use first and can easily identify any herbs that may be past their prime.
To ensure you’re using the freshest and highest quality herbs, it’s important to keep track of the harvest date and the type of herb in each container.
By labeling each container with this information, you’ll be able to easily identify the herbs that were harvested most recently and those that may be past their prime.
For example, if you have a container of fresh basil that was harvested last week, you’ll want to use that first before moving on to older batches.
By labeling your containers with the harvest date and herb type, you’ll be able to plan your meals and herb use accordingly, ensuring that you always have the freshest ingredients on hand.
This labeling system will help you avoid confusion and waste, as you’ll be able to quickly identify any herbs that are no longer good to use.
Overall, labeling your herb containers with the relevant information is an essential step in ensuring you’re using the best possible ingredients in your cooking and preserving the freshness of your herbs.
Want More? Dive Deeper Here!
Hey there! If you’re the type who loves going down the rabbit hole of information (like we do), you’re in the right spot. We’ve pulled together some cool reads and resources that dive a bit deeper into the stuff we chat about on our site. Whether you’re just killing time or super into the topic, these picks might just be what you’re looking for. Happy reading!