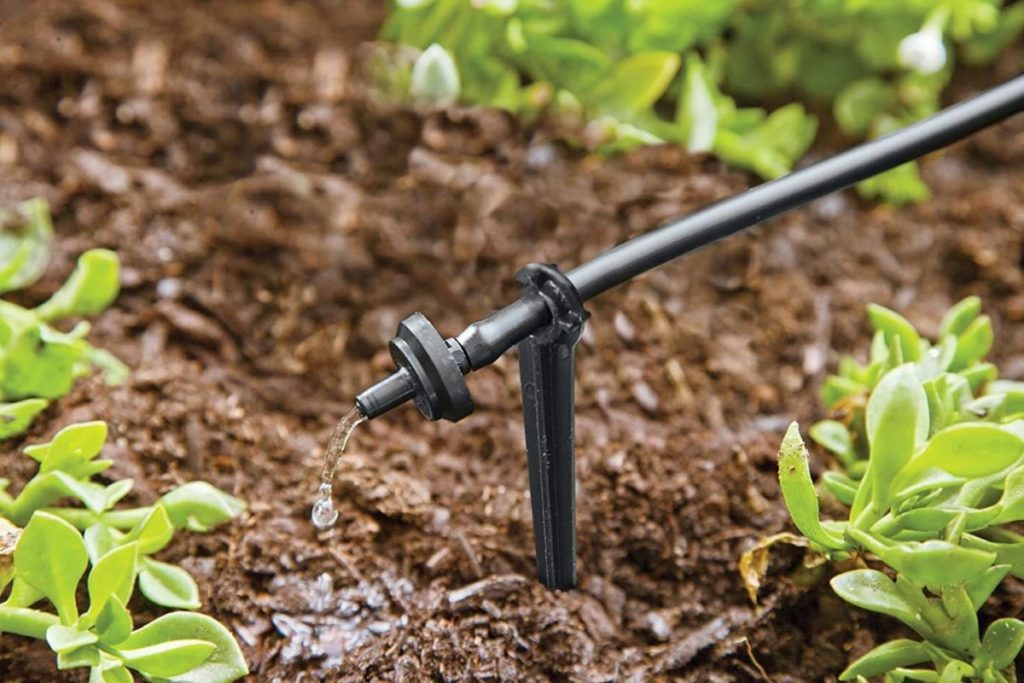
Do you want to save money on your water bill while still maintaining a healthy and thriving garden?
Look no further than DIY drip irrigation!
This beginner-friendly guide will walk you through the process of setting up a cost-effective drip irrigation system that is easy to install and customize to your specific needs.
With these simple steps, you can say goodbye to overwatering and hello to a more efficient and sustainable gardening experience.
Get started with DIY drip irrigation today and start enjoying the benefits of this innovative water-saving technology!
Plan Your System
Before you start, decide on the layout of your drip irrigation system. Decide which plants you want to water and where the lines will run. Make sure to take into account any obstacles like slopes, hills, or existing gardens.
First, identify the plants you want to water and determine their specific watering needs.
Consider the distance between each plant and the water source, as well as any obstacles such as slopes, hills, or existing gardens that may impact the placement of the lines.
Take into account the elevation changes and the direction of the sun to ensure that water is delivered to the plants effectively.
Create a detailed map of your garden, indicating the location of each plant and the planned path of the drip irrigation lines.
This will help you to visualize the system and make any necessary adjustments before installation.
By taking the time to plan your system, you can ensure that your drip irrigation system is efficient, effective, and tailored to the unique needs of your garden.
Choose the Right Materials
Drip irrigation systems use PVC or polyethylene pipes, connectors, and fittings. Choose materials that are durable and resistant to chemicals and minerals found in the water.
Choose the Right Materials: Drip irrigation systems use PVC or polyethylene pipes, connectors, and fittings.
When selecting these materials, it is essential to choose ones that are durable and resistant to the chemicals and minerals found in the water.
PVC pipes are a popular choice for drip irrigation systems due to their resistance to corrosion and ability to withstand high water pressure.
However, they can be prone to cracking and brittleness over time.
Polyethylene pipes, on the other hand, are more flexible and resistant to cracking, making them a better choice for systems that may experience constant water pressure fluctuations.
When selecting connectors and fittings, it is important to choose ones that are made from materials that are compatible with the water quality in your area.
For example, if your water contains high levels of salt or other minerals, stainless steel or brass fittings may be more appropriate to ensure durability and resistance to corrosion.
By selecting the right materials for your drip irrigation system, you can ensure that it will last for many years and provide optimal performance.
Select the Right Embedders
Embedders are used to secure the tubing to the ground. Choose embedders that are easy to install and can withstand the weight of the tubing and the water pressure.
When selecting the right embedders for your rainwater harvesting system, it’s important to choose ones that are easy to install and can withstand the weight of the tubing and the water pressure.
Look for embedders that have a sturdy construction and are made of durable materials such as plastic or metal.
Consider the weight of the tubing and the water pressure that the embedders will be exposed to, and choose ones that can handle these forces.
Choose embedders that are easy to install and can be easily tightened or loosened as needed.
This will ensure that your system is secure and functional for years to come.
By taking these factors into consideration, you can ensure that your rainwater harvesting system is safe, efficient, and effective.
Use the Correct Fittings
Fittings are used to connect the tubing and to create a slope for water flow. Use fittings that are compatible with the type of tubing you are using. Make sure the fittings are securely attached to the tubing to prevent leaks.
When it comes to creating a successful drainage system, the correct fittings play a important role in ensuring efficient water flow and preventing leaks.
It is essential to use fittings that are compatible with the type of tubing you are using, as using incompatible fittings can lead to reduced performance and increased risk of leaks.
To ensure secure attachment of the fittings to the tubing, it is important to follow the manufacturer’s instructions for the specific fittings you are using.
It is recommended to use fittings that are designed to create a slope for water flow, as this will help to ensure that water flows properly throughout the system and reduces the risk of clogging.
By taking the time to select and install the correct fittings, you can ensure a reliable and effective drainage system that will serve your needs for years to come.
Create a Slopes
A slope is necessary to ensure that water flows through the system correctly. The slope should be about 1 to 2 percent to allow for proper water flow.
Creating slopes in a rainwater harvesting system is important to ensure proper water flow and functionality.
A slope of about 1 to 2 percent is ideal, as it allows for a gradual flow of water from the upper portion of the system to the lower portion.
This slope helps to prevent water from pooling or stagnating in any one area, which can lead to problems such as mosquito breeding and waterborne diseases.
The slope helps to maintain the system’s water pressure, which is essential for efficient and effective water distribution.
Without a slope, water may accumulate in the upper portion of the system, causing overflow and potential damage to the structure.
Furthermore, a lack of slope can lead to slow water flow, which can cause water to become stagnant and increase the risk of waterborne diseases.
By creating a slope, the water is allowed to flow freely and consistently throughout the system, ensuring that it remains clean, safe, and functional.
Overall, creating a slope is a critical aspect of designing a successful rainwater harvesting system, and it should be given careful consideration during the planning and implementation stages.
Use Pressure Regulators
Pressure regulators are used to control the water pressure in the system. This will prevent damage to the tubing and fittings. Adjust the pressure regulator to the recommended pressure for your specific system.
Using pressure regulators is a important step in maintaining a well-functioning irrigation system.
Pressure regulators are designed to control the water pressure within the system, preventing damage to the tubing and fittings.
By adjusting the pressure regulator to the recommended pressure for your specific system, you can ensure that the water pressure remains consistent and appropriate for the system’s components.
This can help prevent damage to the tubing and fittings, as well as improve the overall performance of the system.
To properly use a pressure regulator, you will need to first determine the recommended pressure range for your specific system.
This information can usually be found in the system’s instruction manual or on the manufacturer’s website.
Once you have this information, you can adjust the pressure regulator to the appropriate setting.
It is important to regularly check the pressure regulator to ensure that it is set correctly and making any necessary adjustments as needed.
By using a pressure regulator, you can ensure that your irrigation system is functioning at its best and help prevent costly damage to the system’s components.
Proper use of a pressure regulator can also help improve the overall efficiency of your irrigation system, leading to improved crop health and yields.
Test the System
Once the system is installed, test it to make sure there are no leaks. Turn on the water and check the system for any signs of leaks. If you find any leaks, fix them immediately.
Before you start using your new irrigation system, it’s essential to test it thoroughly to ensure that there are no leaks.
Turn on the water and check the system for any signs of leaks.
If you notice any leaks, fix them immediately.
Leaks can lead to wasted water and reduced system efficiency, so it’s important to address them promptly.
To test the system, you can start by inspecting the pipes, fittings, and connections for any signs of damage or wear.
Look for any signs of moisture or dampness, as these can indicate a leak.
Next, turn on the water and observe the system in action.
Check for any areas where water is seeping out or dripping from.
If you notice any leaks, mark them so you can address them later.
If you find any leaks, the first step is to shut off the water supply to the affected area.
Then, you can use a patch kit or a repair compound to fix the leak.
Make sure to tighten any loose fittings or connections and replace any damaged components.
Once the leak is fixed, turn the water supply back on and test the system again to ensure that the leak is fully resolved.
By testing the system and addressing any leaks, you can ensure that your irrigation system is functioning properly and effectively.
This will help you avoid wasted water, reduced system efficiency, and other potential issues that can arise from leaks.
So, before you start using your irrigation system, take the time to test it thoroughly and fix any leaks you find.
This will save you time and money in the long run, and help you achieve the optimal performance from your system.
Add Filters and Drains
Filters can be added to the system to remove impurities from the water. Drains can be added to prevent water from accumulating in the system. Install the filters and drains before activating the system.
When setting up a hydroponic system, it is essential to include filters and drains to ensure the water remains pure and free from impurities.
Adding filters to the system can help remove any sediment, bacteria, or other contaminants that may be present in the water.
These filters can be installed at various points throughout the system, such as before the pump or after the reservoir.
It is important to choose the right type of filter for your system, as some filters may not be effective for certain types of impurities.
Drains can be added to the system to prevent water from accumulating and causing damage.
These drains can be installed at the bottom of the system or near the points where the water is pumped out.
Proper installation of filters and drains can help prevent clogging, bacterial growth, and other issues that can lead to system failure.
Before activating the system, make sure all filters and drains are properly installed and functioning correctly to ensure optimal performance and longevity of the system.
Want More? Dive Deeper Here!
Hey there! If you’re the type who loves going down the rabbit hole of information (like we do), you’re in the right spot. We’ve pulled together some cool reads and resources that dive a bit deeper into the stuff we chat about on our site. Whether you’re just killing time or super into the topic, these picks might just be what you’re looking for. Happy reading!


